What is the Blog Etc Laravel Blog Package?
The included admin panel view, so you can easily post to your blog
The Blog Etc package is a PHP package designed for Laravel websites/apps, that allows you to very quickly and easily add a powerful and useful blog system into your website.
All the controllers, routes, models, views and database migrations are included. You can get your blog up and running in just a few minutes. By default it will be at yoursite.com/blog (and the admin panel at yoursite.com/blog_admin) but you can change this to anything you want.
The package also includes a backend admin panel, to add new blog posts, manage existing posts, create blog post categories, handle image uploads, and manage comments.
This is intended as a package you can just install with composer and get a blog up and working.
Key features of BlogEtc and why you should use it to power a blog on your Laravel based website:
- Quick + easy install:
- Install it with composer,
- add some logic to your User.php file (to allow to not allow certain users to manage your blog - for example only allow the user with id == 1, or email == [email protected], etc)
- It will (with
php artisan vendor:publish) copy the sample template files to your /views/vendor/blogetc/ directory, so you can easily edit how the blog will look. By default it should work with most themes, but you will probably have to edit it a little bit to make everything work with your current CSS/style. - and that is basically all! But check the full 5-minute setup guide here
- Sept 2018: Now includes full text search, so your users can search for things (disabled by default in the options, but you can enable it by changing 1 setting)
- Easy to use admin panel (package includes all views, models, routes setup
etc)
- Add and Manage Categories: Go to yoursite.com/blog_admin/ (while logged in with a user as set up in User.php) and add your blog categories ("Site News", "Programming Tips", "Best Laravel Packages")
- Add and Manage Blog Posts: again, in the admin panel you can add a blog post (including uploading thumbnail/featured images, which auto crop/resize). Select its category, change its 'slug', add meta description detail etc.
- Sept 2018: Now includes full WYSIWYG editor in the admin panel for writing blog posts
- Sept 2018: You can also upload images, and it will auto resize to your defined sizes.
- View the blog and also add comments via a simple form (again, all this is provided out of the box but of course I would recommend that you take the template files and customise them for your website!)
- Includes basic built in spam protection for blog comments, that is fully extendable so if you wanted to you can write and implement your own anti spam system
- And lastly you can moderate submitted comments (approve/deny comments) from within the admin panel.
Minimum Requirements
Laravel 5.6, 5.7.
There are a few requirements in the composer.json file, but it should work with
all
Laravel 5.6 or higher installations.
What it is suitable for / what it is not suitable for
Suitable for:
- Websites where YOU (or your team, etc) are the only people who will be writing blog posts. (i.e. like a normal, typical company blog). They must be trusted users as with the default settings it will output whatever HTML (including any JS) that they enter.
- Websites running Laravel
Not suitable for:
- This package is not suitable if you allow random users (not trusted users) to add blog posts. This package can allow users to write their own HTML. It is intended to only be used by authorised trusted users.
- Non Laravel websites
You must edit your User.php file (the one that comes with Laravel) and add a method
canManageBlogEtcPosts() which returns true or false. You should write some
custom code to
only
allow your admin user to manage the blog posts.
Screenshots of BlogEtc Laravel Blog Package
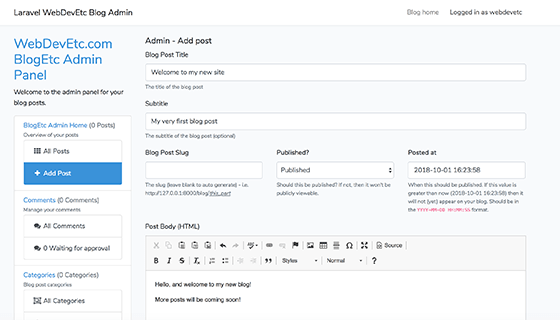
Admin backend
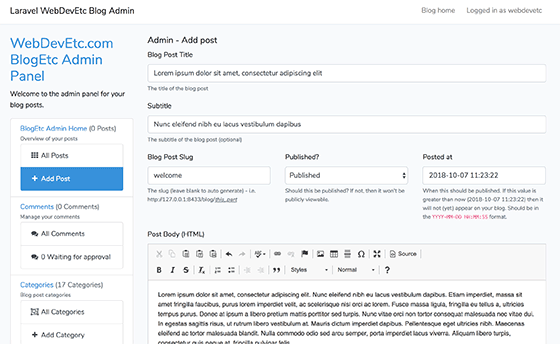
Creating a post in the included admin backend
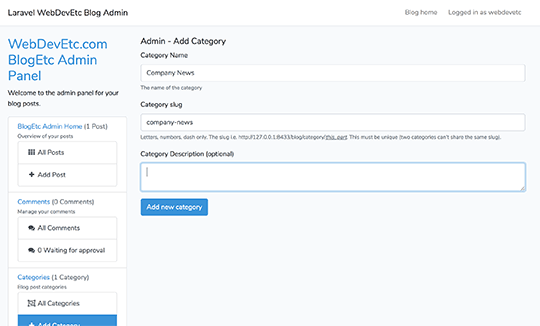
Creating blog categories via the admin panel interface
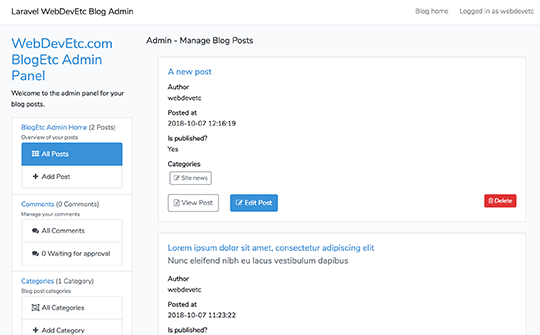
View and mange your blog posts
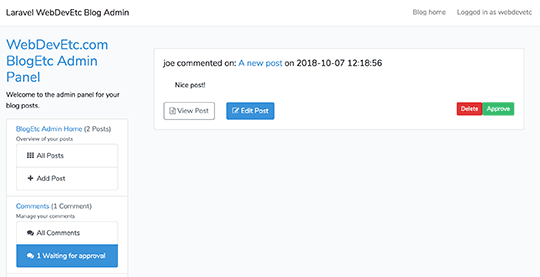
Approve or deny blog comments
Public facing pages (i.e. viewing the blog posts)
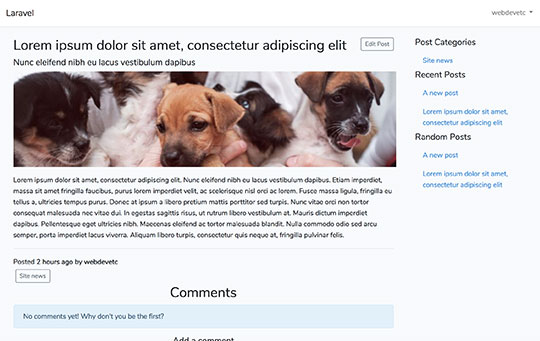
Viewing the full single post. It is easy to change the included view files to match your current site layout/theme. Includes simple to include blade partials for post categories, random posts and most recent posts.
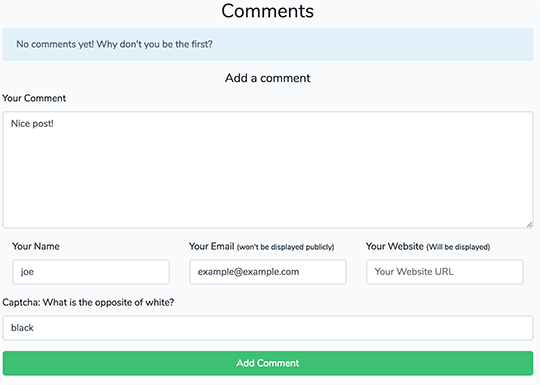
Adding a blog comment with the included form (easily editable to fit your theme/layout). Also works with Disqus with one simple config change.
5 Minute Install Guide
- Install via Composer (Find details
on
Composer here).
Run this command: - The package will install, and it uses the Laravel Auto Discovery to automatically register the service provider so you don't need to add the service provider to app.php..
- You must run the following two commands to copy the
config/blogetc.php, view files (to /resources/views/blogetc/) and database migration files over to your app:
And then also run this command, so that we can do the full text search (do not do this if you are using SQLite, as it uses an ALTER TABLE command which isn't supported on SQLite: -
Now you need to run the database migration.
The database migration hasRun the following code to run the migration that is now in your /database/migrations/ directory:
...->foreign()...->onDelete("cascade")code for blog comments. You might want to remove the foreign key. It is fine to run it without editing the migration though :)php artisan migrate; - Define a gate to allow admin access (for certain users)Add the
following to AuthServiceProvider:
- Gate::define(\WebDevEtc\BlogEtc\Gates\GateTypes::MANAGE_BLOG_ADMIN, static function(?Model $user){
- // Implement your logic here, for example:
- // Or something like `$user->is_admin === true`
- });
Note: the old way of adding a
canManageBlogEtcPosts()method to your User model is deprecated. The default gates will try and usecanManageBlogEtcPosts()so it is still backwards compatible - Create a directory called 'blog_images' in your '/public/'
directoryYou can change the directory name from
public/blog_images/to anything else, via theblog_upload_diroption inconfig/blogetc.php
Then make it writable for your web server. This will depend on your own server setup. Click to show detailsmkdir public/blog_images; -
When you run
php artisan vendor:publish(from above), it will copy over all the view files to /resources/views/vendor/blogetc. They are easy to modify to your needs. By default it assumes that it can@extend('layouts.app'), but you can easily change this to whatever you need.
To use the default views without editing them, you must have a/resources/biews/layouts/app.blade.php(with@yield("content")in it). This is in most people's Laravel app, as it is created when you dophp artisan make:auth. But, if you do not click here to see details-
I also recommend that you use the
$titlevariable in the<title></title>tag. - Also the included views/layouts assume that you are using Bootstrap 4. If you are not using Bootstrap 4 then it might not display correctly. However customising the views is very simple! (see section below)
-
I also recommend adding
{!!\WebDevEtc\BlogEtc\Helpers::rss_html_tag()!!}somewhere in your<head>tag to automatically add the blog's RSS feed<link rel="alternate" type="application/rss+xml"...code. - See the details below about customising the template views too
-
I also recommend that you use the
- That is it! The basic install is done! Now you should be able to go to
http://yoursite.com/blog_admin/ (or
http://localhost/blog_admin/) to see the admin panel (as long as you are logged in as a
user
that
canManageBlogEtcPosts()returns true for!), make some posts, then go to http://yoursite.com/blog/ and http://yoursite.com/blog/feed/ to see those posts! (remember you can change these URLs in the config file)
- I recommend that you work out what image sizes you want to use (this will probably
depend on your site's layout and what size thumbnails you want to use) and make the
appropriate changes in the blogetc.php config file. By default there are 3 image sizes
(thumb, medium, large). If
you want to add more then you have to manually create the database column (just name it
image_$size) and add the relevant data to the blogetc.php config file. The comments in the config file should explain all - please email me if you have any questions. - I do also recommend that you go through the config option and read all of the comments to familarise yourself with what options there are.
- If you have enabled search (via the config file - by default it is disabled), you might
want to add
the search form to your website.You can either include the
blogetc::sitewide.search_formblade view, or use the following code as a template, and add it anywhere on your site (e.g. a sidebar, header area, etc) TODO
Config Options
php artisan vendor:publish
                            --provider="WebDevEtc\BlogEtc\BlogEtcServiceProvider"
to get the
blogetc.php file in your config directory. If you haven't done this, scroll
up to
the install instructions!)
There are a bunch of options, all with sane defaults.
Please see the blogetc.php config file - each config option has its own comment
description. If
anything isn't clear please get in touch.
Guide to customising the blog views/template
The package includes lots of views. They are automatically copied over to your /resources/views/blogetc/ directory.
It contains a very basic layout that should work out of the box for most users,
using @extends("layouts.app").But, if it doesn't work or look correctly, it is
very easy to customise and modify the view files. Find them in
resources/views/vendor/blogetc/
You can also include the following partial views in your site's design (e.g. in your sidebar):
To show a list of categories:
@include('blogetc::sitewide.show_all_categories')
To show most recent posts:
@include('blogetc::sitewide.recent_posts')
To show random posts:
@include('blogetc::sitewide.random_posts')
To show search form: @include('blogetc::sitewide.search_form')
Linking to the blog
You can easily link to the various types of pages:
route('blogetc.index')for the blog homepageroute('blogetc.search')for the search pageroute('blogetc.feed')for the RSS feed urlroute('blogetc.view_category',$category_slug)for the blog category pageroute('blogetc.single', $blogPost->slug)(or$blogPost->url()) for a single postroute('blogetc.admin.index', $blog_slug)for the blog admin pageroute('blogetc.admin.edit_post', $blogPost->id)(or$blogPost->edit_url()) for the edit post url
Please see the routes.php (github link) file for more.
Events
You can find all the events that are fired by looking in the /src/Events directory.
Add these (and an Event Listener) to your EventServiceProvider.php file to make use of these events when they fire.
Testing
Tests are included. Please see MainTest.php for details.
Full text search built into the blog system
Version 2.0 includes full text search. It is disabled by default.
To use this, you must turn the config("blogetc.search.search_enabled") to true,
and run the
migration associated with the Laravel Fulltext package. See the note in the config file (it
is just a
vendor:publish and then migrate).
It requires the swisnl/laravel-fulltext package (auto installed when you
install this
package via composer), however it is easy to disable the core search functionality (some
people might
not want this set up on their servers, and I've only tested it with mysql drivers - this is
why it is
disabled by default).
Captcha
There is a basic anti-spam captcha function built-in.
See the config/blogetc.php captcha section. There is a built in system (basic!) that will prevent most automated spam attempts.
Writing your own captcha system:
I wrote the captcha system simple on purpose, so you can add your own captcha options. It should be easy to add any other captcha system to this.
If you want to write your own implementation then create your own class that implements
\WebDevEtc\BlogEtc\Interfaces\CaptchaInterface,
then update the config/blogetc.php file (change the captcha_type
option).
There are three methods you need to implement:
public function captcha_field_name()
: string
Return a string such as "captcha". It is used for the form validation and <input name=???>.
public function view() : string
What view file should the blogetc::partials.add_comment_form view include? You can set this to whatever you need, and then create your own view file. The default included basic captcha class will return "blogetc::captcha.basic".
public function rules() : array
Return an array for the rules (which are just the standard Laravel validation rules. This is where you can check if the captcha was successful or not.
Optional:
public function runCaptchaBeforeShowingPosts() :
null
This isn't part of the interface, it isn't required. By default it does nothing. But you can put some code in this method and it'll be run in the BlogEtcReaderController::viewSinglePost method.
Reporting Bugs / Security Issues
Please just send me an email via the contact form, I'll get back to you ASAP.
Known issues/notes
SQLite migration error
Please note that because of the migration for the full text search won't work with SQLite (which does an ALTER TABLE, which won't work in SQLite). Fix: You will have to delete that migration, and turn off search in the config. Sorry! Please let me know if this affects you - I don't know if many people use SQLite for their Laravel apps or not.
Image upload errors?
make sure that /tmp is writable. If you have open_basedir enabled, be sure to add :/tmp to its value.
Ensure that /public/blog_images (or whatever directory you set it to in the config) is writable by the server
You might need to set a higher memory limit, or upload smaller image files. This will depend on your server. I've used it to upload huge (10mb+) jpg images without problem, once the server was set up correctly to handle larger file uploads.
Data too long for column 'indexed_content'
If you get the following error:
                            1 Doctrine\DBAL\Driver\PDOException::("SQLSTATE[22001]: String data, right truncated: 1406
                            Data too long for column 'indexed_content' at row 1")

                            vendor/doctrine/dbal/lib/Doctrine/DBAL/Driver/PDOStatement.php:144


                            2 PDOException::("SQLSTATE[22001]: String data, right truncated: 1406 Data too long for
                            column 'indexed_content' at row 1")

                            vendor/doctrine/dbal/lib/Doctrine/DBAL/Driver/PDOStatement.php:142
Then this is because the default
2016_11_04_152913_create_laravel_fulltext_table.php migration uses TEXT as the
column type for indexed_content, and obviously your blog post content was too long for this
(65,535 characters / 64 Kilobytes). Change it to MEDIUMTEXT (16 Megabytes) or if that is
somehow not enough (!), then LONGTEXT (4 GB).
Or you can just disable the search feature in the config file.